Russian “MIG” cockpit clocks are widely available online and make a great desk clock. I recently received one for my birthday and designed this 3D printed stand for it (available free on Thingiverse). For reference, here’s a bit more about these clocks.

These clocks are properly known as “АЧС” for the (Russian) model number, but they’re also sometimes referred to as “MIG clocks” since they are designed for use in Russian planes, including many MIG models beginning with the MIG-15. They are also commonly referred to with the Anglicized “A4C”. All are hand-wound and include one or two stopwatches.
During World War II, the Allies supplied the Russians with technology, including Swiss, American, and English watches and clocks. Jaeger had designed a standard cockpit clock, known as the “Chronoflite” and fitted with a LeCoultre movement, in 1930. Smith in England added an elapsed time function and Jaeger and LeCoultre later added a stopwarch as well. Many of these were used in World War II aircraft.
After the war, the notable Russian clockmaker Восток (Anglicized “Vostok” and meaning “East”), began producing their own Chronoflite variants. Initially these were faithful copies of the Jaeger-LeCoultre model, but they later added their own touches, including double-barrel power.
There are a few models of АЧС clocks:
- “АЧС-1” – Hours, minutes, central seconds, 60 minute stopwatch counter at 6:00
- “АЧС-1M” – Hours and minutes, central stopwatch seconds, 60 minute stopwatch counter at 6:00
- “АЧС-1MN” – Hours and minutes, central stopwatch seconds, 30 minute stopwatch counter at 6:00
All three models include flight time in hours and minutes at 12:00. The square or round white and red function indicator at 12:00 inside the flight time dial indicates three modes of operation:
- Red: Flight time is running
- Red/White: Flight time is stopped
- White: Flight time is reset

1 – Flight Time subdial
2 – Current Time dial
3 – Stopwatch subdial
4 – Stopwatch control (start, stop, reset) and Hacking switch
5 – Wind, Set Time, Flight Time control (start, stop, reset)
6 – Flight Time indicator
Given that the clock includes running time, flight time, and stopwatch, the controls can be confusing.
The red knob on the left is used to wind the clock and set the time as on a normal watch. It is also used to control the Flight Time function (subdial at 12:00), which is started, stopped, and reset as on a conventional chronograph watch but lacks a seconds hand of its own. The red and white indicator inside the Flight Time subdial indicates which mode is currently selected.
The knob on the right has multiple functions as well. It can be used as a switch to stop and start the entire clock using a simple hacking lever. It is also used to start, stop, and reset the Stopwatch function (subdial at 6:00), which includes the central seconds hand on most models.
This clock has one more interesting feature. Since airplane cockpits can get quite cold, a simple electric heater is embedded inside the rear of the case. The electric terminals on the back are for a 27 volt DC supply, and a simple reed thermostat and resistance coil inside keeps the movement warm. I do not recommend trying this out on a desk clock since many heaters are missing or non-functional and shorted out.
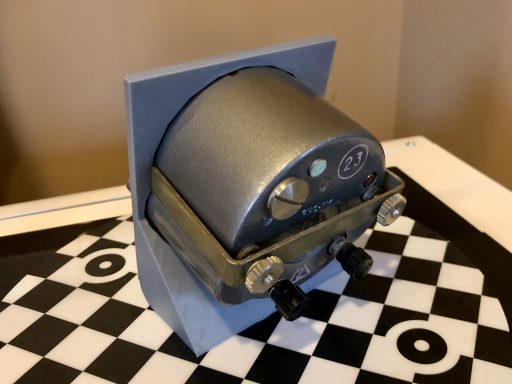
One final control is located on the rear of the clock: A simple corrector screw allows the movement to be sped up or slowed down without opening the case. If you do happen to open the case you will see the year of manufacture stamped there.
These clocks are widely available on eBay, in forums, and on specialty web sites, typically priced under $100. Look for a good one since they’re not particularly rare. Although early examples may have used radium (radioactive) paint, most do not.
I decided to create my own 3D printed stand for the clock I received. In keeping with the Russian aircraft theme, I added a couple of faux screws at the top and the text, “ВРЕМЯ ПОЛЕТА” or “Flight Time” at the bottom.
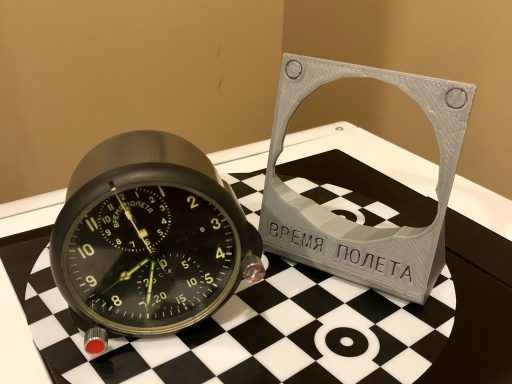
My stand is designed to hold the clock securely using the original bracket, as seen in the rear photo above. I recommend adding rubber feet to the bottom, though the clock itself is heavy enough to keep it in place. You can find my 3D model at Thingiverse and can print your own or order one printed. Enjoy!
Year
Country
Brand
Style
Material
Movement
Hi Stephen,
I wish to use this beautiful MIG clock into my Morgan dashboard.
As I read you know a lot about this clock. So…some questions;
– can the clock be connected to 12 volt car electronics. Or…just wind it up like early times.
– I wish to change the ‘watchface’ into ivory. Like Smiths classic clocks. So…is it easy to dismantle or take off the glass ?
If so…do you own trustfull ‘new’ one to buy ?
Greetz,
Ron
It’s a mechanical clock, so it will run without electricity at all. Kind of like your Morgan! Haha!
The electric terminals are only for an internal heater, which you probably won’t need unless you’re driving in the arctic in December. And knowing Morgan owners, you just might!
As for disassembly, I believe it would be very easy. It’s quite large and uses common screws.
But if you want a dashboard clock, it might be better to buy a simple quartz movement and make your own dial and enclosure.
Hello,
thank you for this wonderful bit of information, I have one on my desk for about twenty years now; and it is still working perfectly, and most of all, it keeps accurate time.
Have a great day.
Hi Stephen,
How do I order your stand to be printed? It looks amazing. I dont have a 3D printer but I am hoping to purchase your stand.
I believe there are a number of inline sources for 3D printing. Since I have my own printer I don’t know much about them. Many local libraries, etc also have a printer to use if you bring the STL file.
I just got my first Mig clock today from a friend.
Thank you for your great website on how to use it.
Question I do not have a 3D printer how can I buy one of these clock stands?
I’m pretty sure there are printing services that will print it for you for a small fee. Otherwise, many libraries have 3D printers now.
Thanks for the information. I found a place on eBay selling them.
This is my first aircraft clock and I love it. And I just want to display it on y desk
Thanks so much for the 3D file! I have the exact same clock and just had it printed with a resin printer based on your design, looks gorgeous.
I bought an ACHS-1 clock and a 59 ChP clock ages ago from a flea market in Moscow. I rediscovered them today and have been looking for specifications and instructions for them. Your site has really helped me.
I am particularly interested in the stand you made. I have some scrap aluminum sheet in the garage and I think I’m going to make an attempt to use it for a stand.
Thank you for the information and the inspiration!
Hello. On my A4C clock there’s a small adjustment screw underneath a large screw-cap on the back. The body of the clock is labeled “-” and “+”. Intuitively, if the clock is running fast I would tend to think one would turn the adjustment screw counterclockwise toward the “-” sign, but then again this is a Russian clock and I cannot find any reference as to which way to turn the adjustment screw. Can you possibly shed some light on how to adjust the accuracy of this clock? Thanks
This is a very useful and comprehensive article about the AChS-1M clock.
We are grateful for providing us with the 3D printer file for the stand.
I was looking for one and your file saved the day.
Now my MiG clock has a great looking stand.
Keep up the good work!